 |
| Forward Facing Bookshelf Before and After |
For some time I have been pinning loads of ideas on my Pinterest page with ideas for bookshelves for my sons room. I saw all sorts of ideas, rain gutters, ikea spice racks, ikea picture ledges, and finally some baseboard shelving. There are so many different ways to attach baseboard shelving, and mine is another way but depending on your space one of these other links may help you.
Links:
Sara's Art House: Baseboard ShelvingTried and True - Floating Baseboard Shelving
Sunshine on the Inside: Rain Gutter Shelving
Budget Summary:
Baseboard leftover from other project $15 but has done 3 projects so far so lets call this $5.Pine Shelving Boards: $24
Paintable Putty: Another leftover from the bathroom makeover
Nails - Had on hand
Total Cost $29
Tools: borrowed from dad
Tools:
HammerNails
Nail Set
Stud Finder
Level (one long, one short)
Mitre Saw
Table Saw
Razor knife
Sand Paper
Vacuum (for all the sawdust!! lol)
The How To:
When I am planning a project that involves hanging heavy things on the walls I always get out my stud finder and check where the studs are. I know that boys will be boys and will try and climb everything so I want my projects to be robust and structurally sound. Initially I wanted to install shelving in my sons room in the dead space behind the bedroom door, unfortunately there was only one stud behind the door near the frame, and the next one hit behind where his crib is. It was then I knew I would have to look at other options.
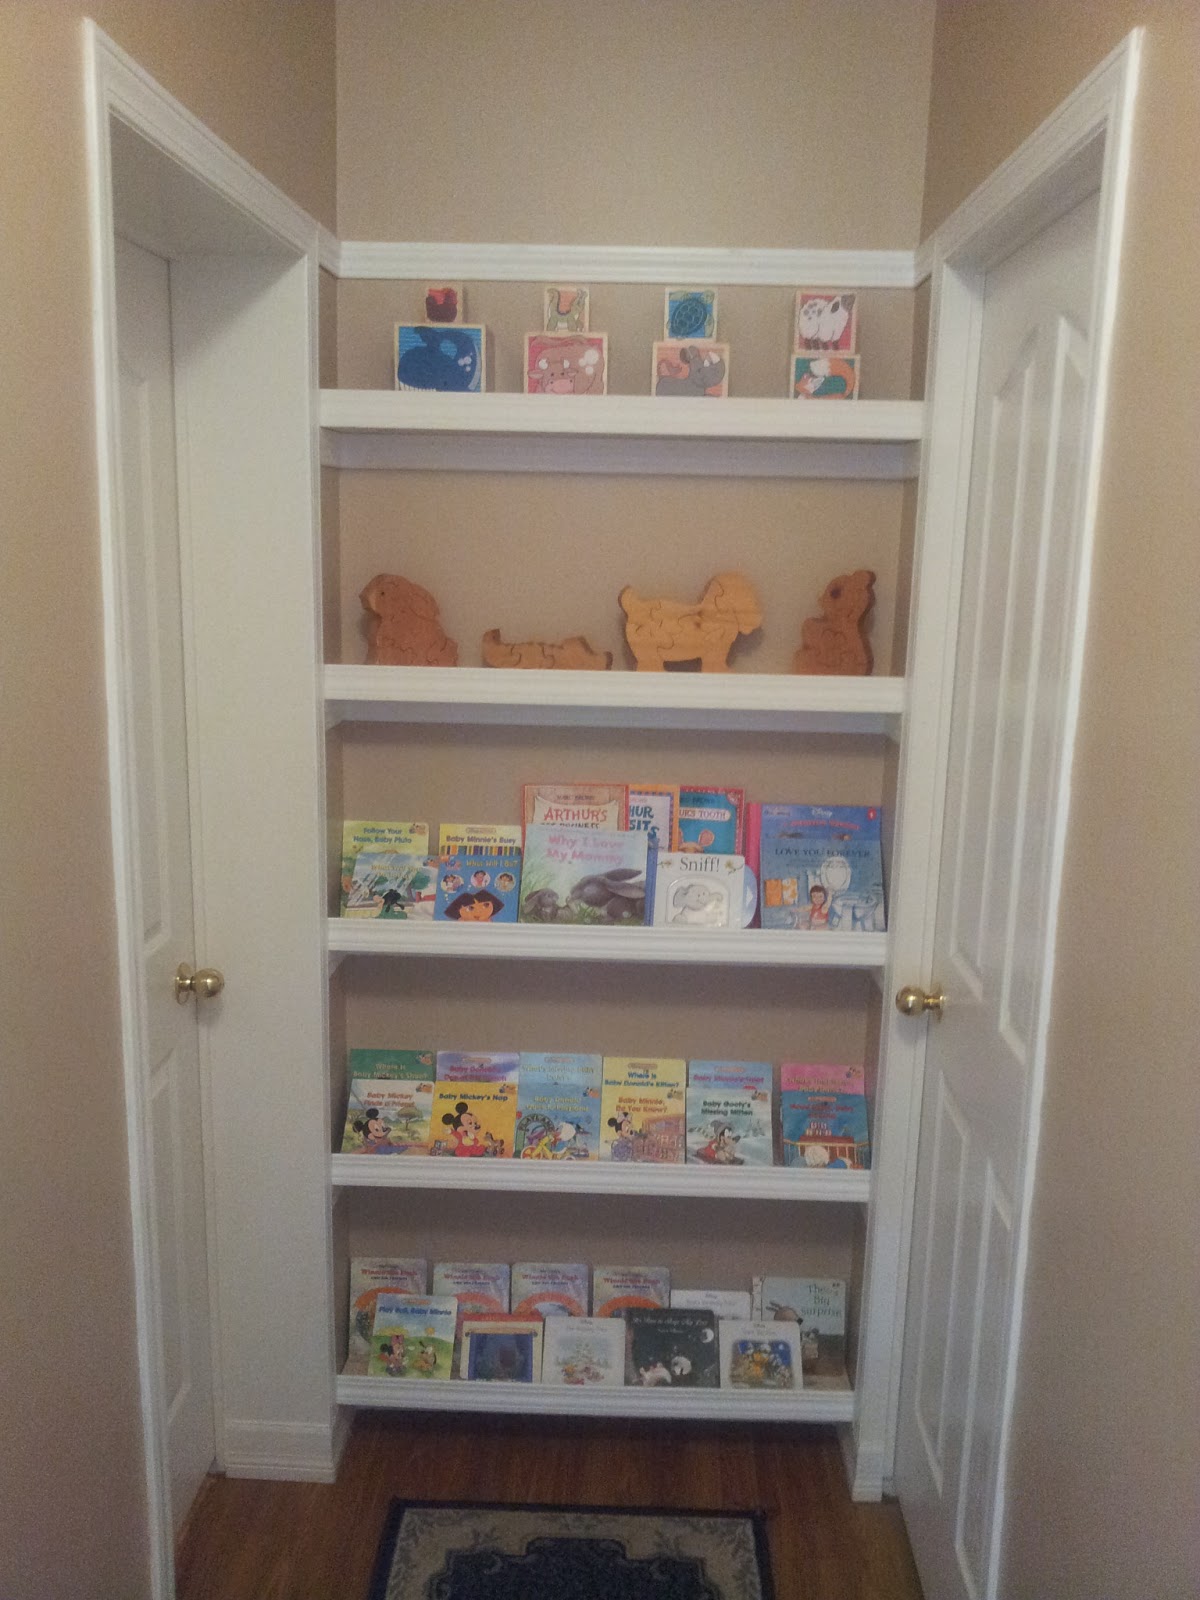
I decided to use this little dead space at the end of my hallway. I used to have a framed picture up on the wall and a full length mirror at the end of the hall (covering up where our floating laminate floor does not reach the edge due to expansion/contraction in our canadian weather). In the end I am actually glad this ended up out in the hallway instead of my sons room. I can picture in my head the toddler tantrums and being sent to his room only to rip every single thing off the shelves, or even being a monkey and trying to climb them.

This space is just over 6 inches deep from the edge of my doorframe to the wall. There were 2 studs along the back wall to nail to, and there were bound to be studs around the door frame. I attached one piece along the back, and then short pieces down each side to butt against the door frame. The baseboard is actually upside down with the thickest part up which will allow my shelving to sit on top. I will attach another piece of trim to the front of the shelf to "catch" the books.

This was a learning process for me as I have never cut trim before or used a mitre saw. I decided just to cut at a 45 on the joining pieces, rather than mitring and then coping each joint. If you are using raw wood trim I would suggest taking the time to mitre and cope, but as mine were white I just filled any gaps with white paintable putty. I didn't even paint over it in the end.
My first joint:


I learned after the first cut, and went and got my bar clamp to hold my trim from shifting while I was sawing. I don't have a workbench so this was just on my livingroom floor and was a bit tough to hold long lenghts of trim level and steady as I cut before I got the clamp out.
 \
\
For my shelving I used 1x8 pine shelving lumber. It is a bit more expensive than rough sawn lumber, but not my much, and not having to sand is great as I don't actually own a sander. The depth of my space was just over 6" deep, but I had to subtract the thickness of my baseboard that would sit infront of the shelving leaving me with shelves that needed to be exactly 6'. Unfortunately dimensional lumber is not exactly the size it is named by. Click here for dimensional lumber measurement chart. As you can see, a 1x6 is not actually 6 inches wide, so I had to buy a 1x8 and have my dad rip it down to 6`` widths for me on his table saw. I asked them to do this at Home Depot when I bought the lumber, but unfortunately they will not rip anything 6`` or less for safety reasons. I measured the length I needed for each shelf (as they varied a bit) and took an eigth of an inch off to allow the boards enough room to tip into the space in the wall as otherwise the corners of the board catch. I test fit each piece, and trimmed where necessary. I was careful not to trim too much as each shelf needed to sit on top of the supporting baseboards.
I actually at one point had all my trim, shelves and boards up on the wall purely friction fit, not a singly nail holding it all up.I impressed myself. And I only really had this much scrap left over from miss-cuts.

Once everything was test fit in place, i removed the shelving and front trim, and nailed my supporting boards to the wall. I used 2 finishing nails in each piece, and sunk them with a nail set, then filled the holes, and any gaps in the corners with the paintable putty. Be sure to put your nails into the thickest part of the baseboard trim. Otherwise you will be marking up your trim with the hammer trying to get it flush. Plus it will also be the strongest there.

And finally the `finished`project. Ok, so I still have to paint the shelving boards, and then nail the trim on, but I was just so eager to get things on the shelving to see how it looked it may just stay this way for a while.
No comments:
Post a Comment
If you have any questions, or I have missed anything, please leave me a comment and I will do my best to answer. I would also welcome leaving a link or picture of your completed project!