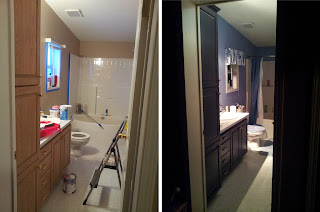
 |
| Before After |
 |
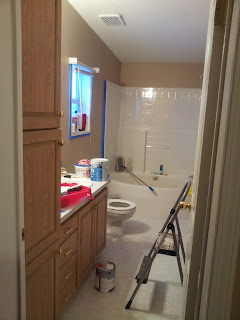
| Before After |
I am not going to do a detailed step by step tutorial as there are already so many other great ones out there. Here are a couple links.
About.com: Painting Cabinets
Centsational Girl - Includes how to and lots of other inspiratoin before/after photos
Somewhat Simple - Instructions for framing mirror including trick to deal with those pesky mirror clips
My notes for this project :
1. Take your time with the primer/paint and do thin thin even coats as it takes way more time to sand off drips and you will probably hope that the paint will cover up your primer drips. It wont.
2. It will take up a lot of space. My kitchen was full of doors for an entire week as they needed cure time befoer rehanging
3: If your caulking looks good and does not need to be replaced, you should first check if the caulking around your cabinets is paintable. If not your paint will bead off. You may need to strip it anyways.
Budget Breakdown: I spent more on this project than usual but there are some things in a bathroom you just cant, or wouldn't want to, get second hand.
Installed a curved shower curtain rod and got a new curtain - $45
Installed a new showerhead as our old one broke 4 years ago and never got replaced as we didn't have a shower curtain anyways. -$10
Bought 2 new hand towels and 2 giant bath sheets $25
Bought a new toilet cozy and bath mat $30
Painted the beige walls blue (leftover from the kitchen) - "free"
Painted our wood veneer cabinets a dark grey - $50
-Benjamin Moore Stix Primer
-Benjamin Moore Advance paint (abyss 2128-20)
Used baseboard to make a frame for our builders mirror and painted to match the cupboards *
Baseboard purchased on kijiji from leftover reno project 8 lenghts - $15 (more projects to come keep your eyes out)
-paintable putty -$8
-Mirror adhesive - $6
Installed a new bathroom light ikea $0.50 on sale - unfortunately it isn't bright enough so i have another new one that still needs installing.
2nd hand (second) vanity light $30
Spray painted all the hardware a satin nickel $5
Installed a new toilet paper holder $10
Replaced valence over the window to match the new scheme $1(value village find)
Total cost - Budget blowing $204ish (eek!!!)
I guess I won't be buying those new shoes.
*Use LePage 610PL Mirror Construction Adhesive it was awesome! Just be sure to crack a window.
I saw in other DIY blogs that people had trouble getting the molding to stay put while waiting for the glue to cure but I didn't have that problem. I assembled the frame on the ground and tacked the corners with wood glue. I also added dab of hot glue in the low spot on the back of the molding (so that it wouldn't raise the frame from the mirror) Our builders mirror had clips on it so i had to carve out spots on the back of the molding to fit overtop. The mirror also sat right on top of the counter molding so the frame was able to rest on that while the glue cured, holding the weight of it up.
And now... with the photos. I may as well start with a couple of before/afters as they are my fave:
 |
| Taping for paint |
 |
| Painted walls but now the vanity doesn't match.. guess it needs painting too |
 |
| Dark grey painted vanity |
And now for the process and detail shots:
 |
| Removed all the doors and drawers, taped around the drawer fronts Note that I was too lazy to acutally take anything out of the drawers :) |
 |
| Primer |
 | |||
| First Coat |
 |
| Second Coat |
 |
| primed the doors |
 |
| First coat Cannot stress this enough... lots of thin coats better than one thick one |
.jpg) | |
| Ok, blogger again is loading pictures sideways, but here is my new light fixture |


Well done you !
ReplyDeleteLooks great! Nice transformation at a great price!
ReplyDelete